英语
英语 俄语
俄语Content
Single-ear hose clamps are very secure and provide excellent sealing once installed. They are mainly used in pipe connections that don't require frequent disassembly, such as automotive fuel lines or household water and gas pipes. Installing them isn't as straightforward as with regular screw-type clamps; it requires a bit of finesse.
Here are the specific installation steps and points to note:
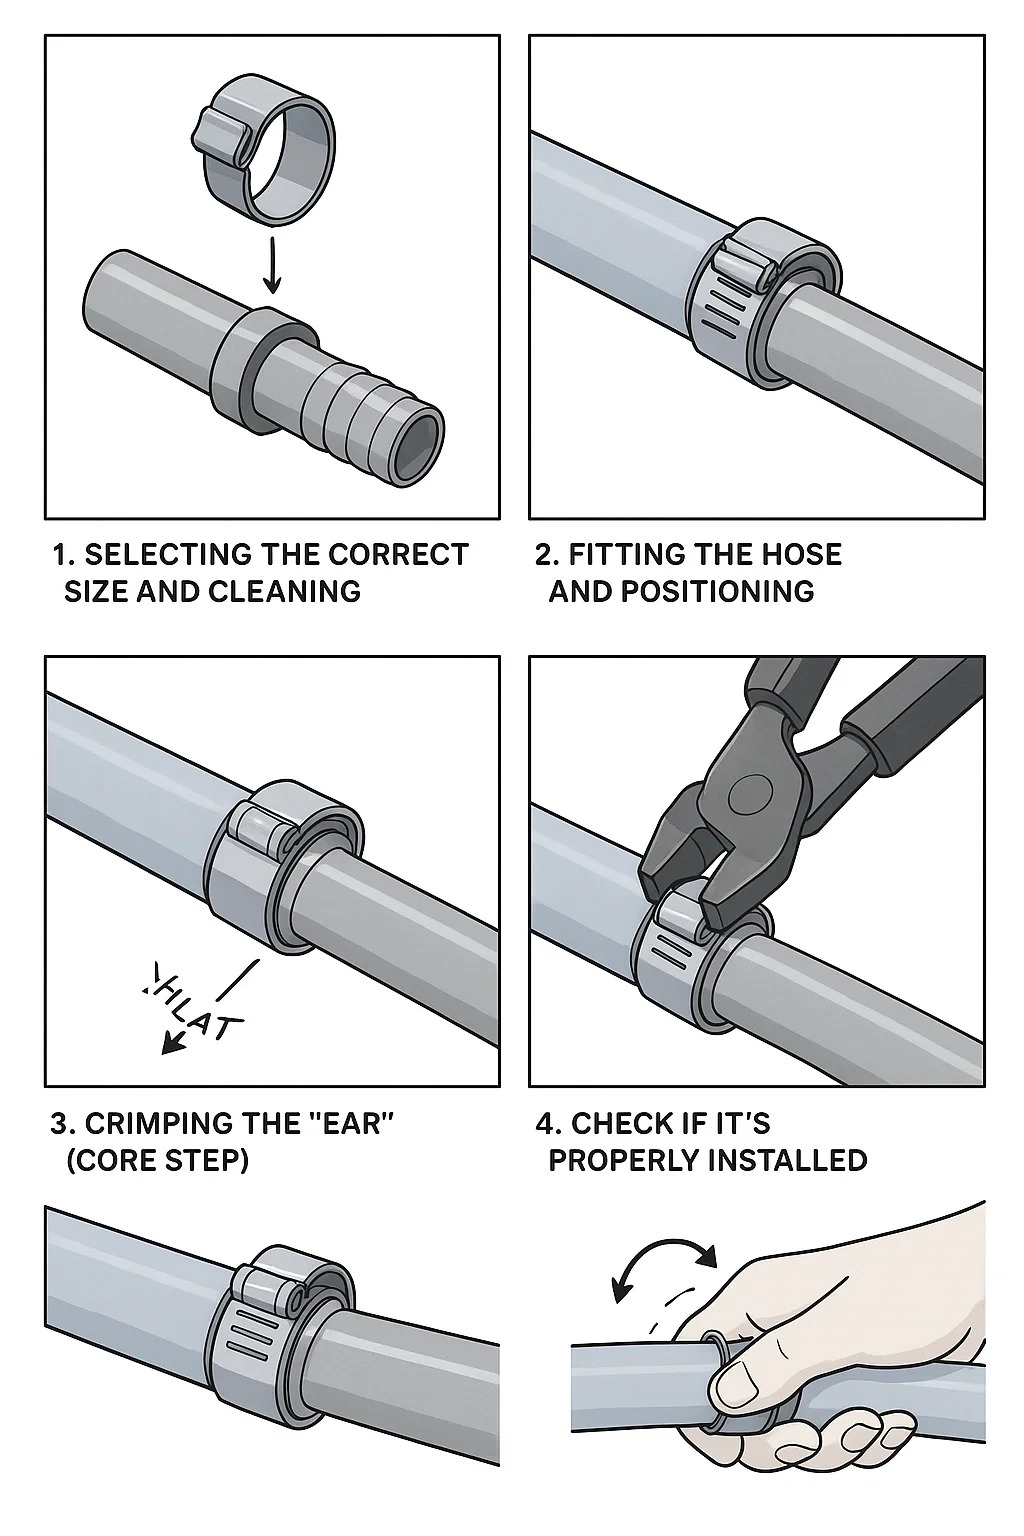
1. Selecting the Correct Size and Cleaning
Before you start, make sure the hose clamp you have is the correct size. Unlike screw-type worm gear clamps, these ear-type clamps have a very small adjustment range.
Cleaning: Clean the end of the hose and the hard pipe connector thoroughly. The surface should be smooth, free of oil and debris, for optimal sealing.
Comparison: When the clamp is not tightened, it should easily fit over the hose, but not be too loose. If it's too large, it won't tighten properly; if it's too small, it won't fit at all.
2. Fitting the Hose and Positioning
The order of this step is crucial; otherwise, you'll have to disassemble and start over.
First, slide the hose clamp onto the hose, pushing it back a little so it doesn't obstruct the opening.
Forcefully insert the hard pipe connector or barbed fitting into the hose, making sure it's fully inserted.
Then, move the clamp back into position. The position is important: don't place it too close to the edge, and don't let it rest on the ridges of the connector. The ideal position is in the middle of the flat section of the connector's barb, leaving a small gap (usually a few millimeters) from the end of the hose. This ensures the most even pressure distribution.
3. Crimping the "Ear" (Core Step)
This is the most critical step; success or failure depends on this. You will need special crimping pliers or pliers with flat jaws.
Open the pliers and firmly grip the sides of the raised square "ear" of the hose clamp.
Squeeze the pliers handles firmly. You will see the "ear" being flattened, and the base starting to constrict. During this process, the inner ring of the clamp is contracting, tightly gripping the hose.
Note the degree of tightening: How tight is tight enough? Generally, you should clamp it until the base of the "ears" are almost completely closed, or until you feel significant resistance and can't clamp it any further. You don't need to clamp it until it's as thin as a piece of paper; as long as it looks like a closed Ω shape or a flat-topped tower shape, it's fine.
4. Check if it's properly installed
After clamping, don't rush to turn on the water or gas. Test it manually first.
Rotate the hose by hand. If the hose clamp doesn't move at all where it's clamped, and the hose doesn't show any signs of rotating, then it's tight enough.
Check if the flattened "ears" are straight. If they are crooked, it means the pliers weren't held level during clamping, which may result in one side being tight and the other loose, increasing the risk of leakage over time.
5. What to do if you need to remove it
This type of hose clamp is designed to be "single-use." If you find that you've installed it in the wrong place, or if you need to replace the hose later, it cannot be loosened and reused like a screw.
To remove it, you can only use diagonal cutting pliers or specialized cutting pliers to cut or pry open the "ears." Once removed, this hose clamp is unusable, and you'll need to replace it with a new one next time.